Microgreens have quietly become a staple in modern kitchens, health routines, and even urban farming setups. These tiny greens may look small, but they’re packed with intense flavor, color, and nutrition. The best part? You don’t need a farm, garden, or fancy equipment to grow them. With a little patience and the right steps, anyone can do it.
In this guide, we’ll walk you through how to grow microgreens at home in a simple, practical way—perfect for beginners, health enthusiasts, and anyone curious about growing their own fresh food.
What Are Microgreens?
Microgreens are young vegetable greens harvested just after the first leaves (called cotyledons) appear. They fall between sprouts and baby greens in terms of growth stage. Popular microgreens include broccoli, radish, mustard, sunflower, pea shoots, beetroot, and wheatgrass.
Unlike sprouts, microgreens are grown in soil or a growing medium and harvested above the root. This makes them safer, tastier, and more versatile in cooking.
Why Grow Microgreens at Home?
Before learning how to grow microgreens, it helps to understand why they’re worth your time.
Microgreens are:
-
Rich in vitamins, minerals, and antioxidants
-
Fresh and chemical-free when grown at home
-
Quick to grow (ready in 7–14 days)
-
Space-efficient (perfect for apartments)
-
Cost-effective compared to store-bought greens
They’re commonly used in salads, sandwiches, smoothies, and garnishes—and they elevate both nutrition and presentation.
What You Need to Grow Microgreens
You don’t need expensive tools to start. Basic items work just fine.
You’ll need:
-
Microgreen seeds (organic or untreated)
-
Shallow trays or containers with drainage holes
-
Coco peat or potting soil
-
Clean water
-
Indirect sunlight or grow light
-
A spray bottle
Choosing quality seeds is important. Seeds meant specifically for microgreens grow more evenly and safely.
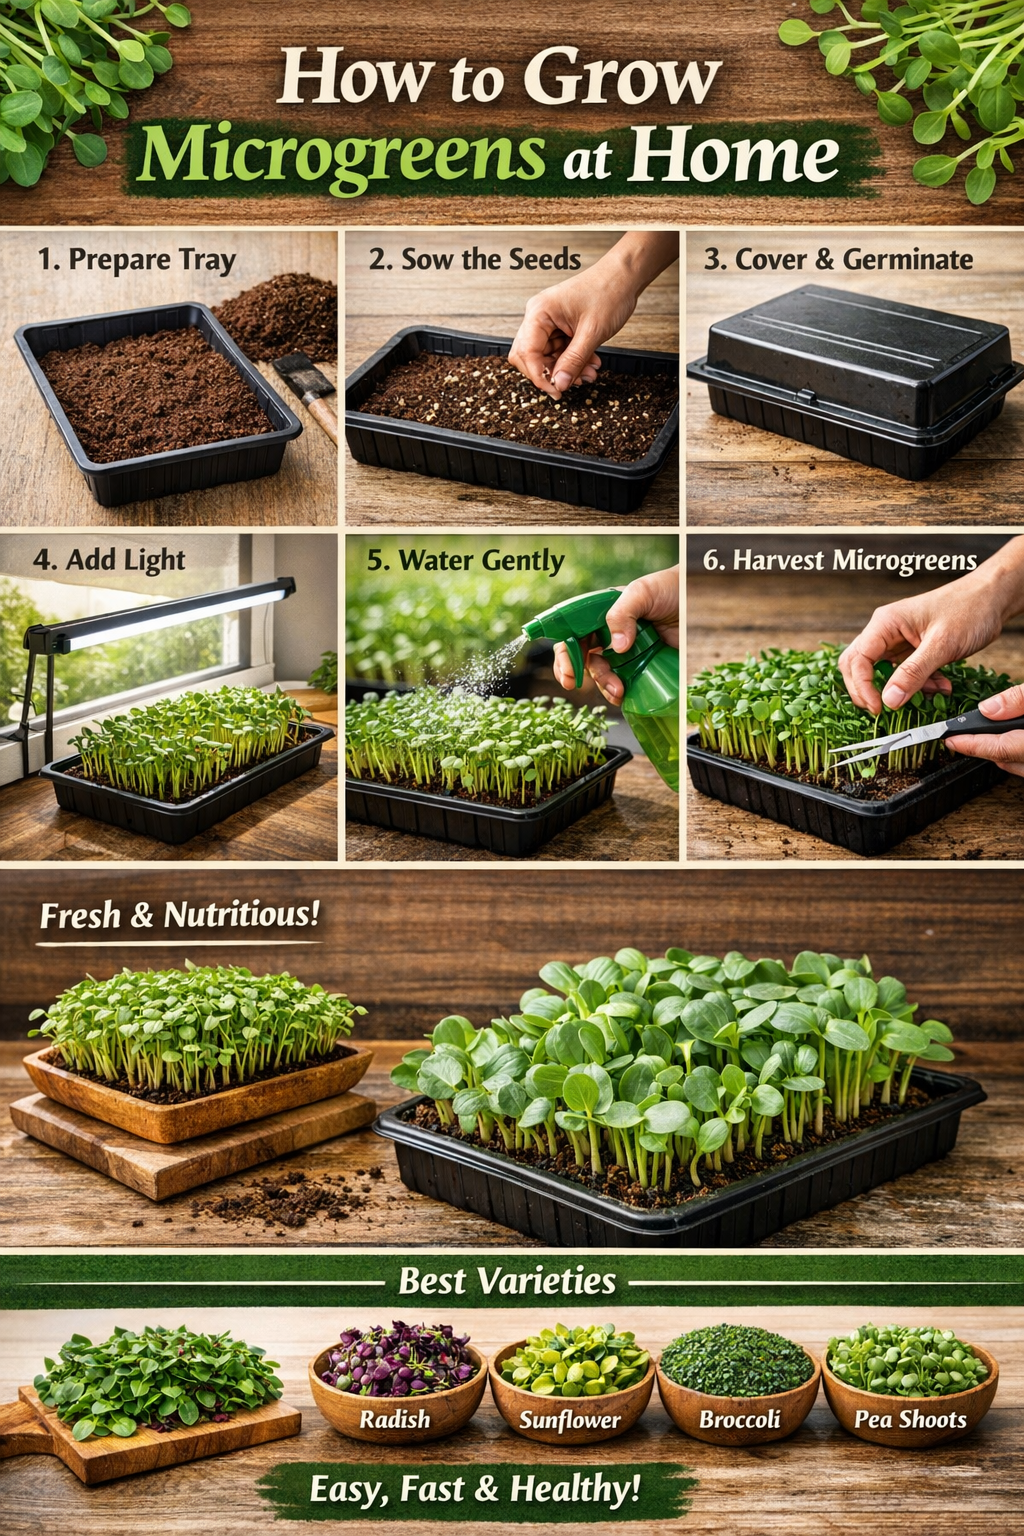
Step-by-Step: How to Grow Microgreens
Let’s break down how to grow microgreens into simple, manageable steps.
Step 1: Prepare the Growing Medium
Fill your tray with about 1–1.5 inches of coco peat or soil. Level it gently without compacting too much. Lightly moisten the surface before sowing seeds.
Step 2: Sow the Seeds
Sprinkle seeds evenly across the surface. Avoid overcrowding, as it can lead to mold or weak growth. Each seed should have space to sprout and breathe.
Step 3: Cover and Germinate
Lightly press the seeds into the soil and mist them with water. Cover the tray with another tray or lid for 2–3 days to block light. This helps seeds germinate evenly.
Step 4: Introduce Light
Once sprouts appear, remove the cover and place the tray in indirect sunlight or under a grow light. This is when the greens start turning vibrant and strong.
Step 5: Water Carefully
Water using a spray bottle or bottom watering method. Keep the soil moist but never soggy. Overwatering is the most common mistake beginners make.
Step 6: Harvest at the Right Time
Microgreens are usually ready to harvest in 7–14 days. Use clean scissors to cut them just above the soil line when the first true leaves appear.
Congratulations—you’ve successfully learned how to grow microgreens at home.
Best Microgreens for Beginners
If you’re just starting, these varieties are forgiving and fast-growing:
-
Radish microgreens
-
Sunflower microgreens
-
Pea shoots
-
Mustard greens
-
Broccoli microgreens
These also rank high in microgreens nutrition and flavor, making them perfect for daily meals.
Common Mistakes to Avoid
Even though growing microgreens is simple, a few mistakes can slow you down.
Avoid:
-
Using untreated or chemically coated seeds
-
Overwatering the soil
-
Poor air circulation
-
Growing in complete darkness after sprouting
-
Harvesting too early or too late
Understanding these helps you improve yield and quality, especially if you plan to grow fresh microgreens at home regularly.
Nutritional Benefits of Microgreens
One major reason people learn how to grow microgreens is their impressive nutritional profile. Studies show microgreens can contain up to 40 times more nutrients than mature plants.
They’re rich in:
-
Vitamin C
-
Vitamin E
-
Beta-carotene
-
Iron
-
Antioxidants
Adding microgreens to your diet supports immunity, digestion, skin health, and overall wellness.
Can You Grow Microgreens Year-Round?
Yes, absolutely. Microgreens don’t depend on seasons. With indoor lighting and temperature control, you can grow them all year long. This makes them ideal for urban homes and people interested in organic microgreens without relying on store supply.
How to Store Microgreens After Harvest
Once harvested:
-
Gently wash and dry them
-
Store in an airtight container
-
Keep refrigerated
-
Use within 3–5 days for best freshness
Freshly grown microgreens taste best when used immediately.
Final Thoughts
Learning how to grow microgreens is one of the easiest ways to start growing your own food. It doesn’t require land, heavy investment, or farming experience. With minimal effort, you get fresh, nutritious greens that enhance both health and lifestyle.
Whether you’re growing for personal use or planning to scale up later, microgreens are a smart, sustainable choice. Start small, stay consistent, and enjoy the process—nature does most of the work for you.